
It is HOT here today.... In fact, it broke the record . It was 113 F (45 C for those of you outside the US) . That is pretty darn warm. And Elly May made leek and onion soup. Go figure. We ate it cold. The ducks did fine with frequent water changes but I went up to check on the chickens , who don't seem to handle the heat as well .... and noticed our White Rock laying limp under the feeder (it hangs) . I ran over and scooped her up . She was still alive and I cradled her in my arms and rushed up to the house... I was thinking of trying to cool her off in some way... she was sooo warm.... but she died in my arms on the way to the house. I wasn't completely sure at the time so I still put her in the sink and ran water over her neck but then I realized it was all too late and she was gone . ..... I felt sorry for her. She was one of the ones on the very bottom of the pecking order and she got picked on a lot. I'd actually thought of culling her earlier as she didn't look the greatest (all the stress of being the lowest of the low can get to one..) but she was still laying and seemed okay despite having feathers pulled out. Well, now I don't have to do that.... Poor girl.
The ducks are 5 weeks old today.... Where did the time go? They shall be completely feathered out soon. And they shall be gorgeous.
The winter greens I started a couple weeks ago when it was cool are getting fried in this heat... We shall see if they survive. I hope so. The top bed is completely empty (except for a squash plant) and ready for planting. I had a soil test done and found I needed to add gypsum so that has been done. We'll see if that changes anything in the coming growing season. Or it may do nothing and those darn bagrada bugs (imported somehow from Africa two years ago.. they look like small harlequin bugs) will eat everything as they seem to be trying to do already. I wonder if cool weather affects them at all?? I guess we'll find that out too.
Showing posts with label chickens. Show all posts
Showing posts with label chickens. Show all posts
Monday, September 27, 2010

Thursday, September 23, 2010
The Post You've All Been Waing For !!! Chicken Butchering 101
Since you've had so many cute posts in a row with nothing to turn your stomach... I decided it was time for a change. These pics have been in my file for awhile.... long before ducks came along. In fact.. these guys had to go because the ducks were coming along. Anyway... if you are squeamish.. and don't want to see how to kill and gut chickens... skip this post. But if you want to see how we do it... by all means continue. I am not posting this to be graphic. We respect our animals in life and hope to do so in death as well. This is more for people who have asked "just how do I go about doing this" . This is how we do it. When I was learning, and before I did my first one (years ago) , I had nowhere to turn but books. Those were hopelessly inadequate and confusing. They all recommend finding someone to show you. But in case you haven't noticed, there isn't a heck of a lot of chicken processing going on in the city ... not this one anyway, and finding someone to show you is near impossible. So, with book in hand and chicken in the other.... I did my first one... it took me about 1/2 an hour because I had no idea what I was doing (where is the jugular??? where does the knife go exactly? why can't they show the arteries in the pictures???!! what do you mean "remove the entrails with your hand "? how? what am I grabbing? what am I looking for?? I just reach in?? yup ) . But I did it! And I felt so accomplished. It is a dying art.... Being able to make chicken soup from scratch... Really from scratch. Now, over a hundred birds later, I feel quite confident and even have a nice system going where we can do things a lot more efficiently. I am the throat slicer, be header, scalder and plucker . Then I pass them off to Mom and Elly May who are expert gutters. I have a knack for tearing livers and they don't.
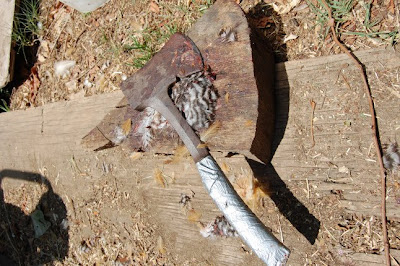 How poetic... j/k .. This isn't really in sequence and I don't kill them with a hatchet.. It sends the birds into shock and they don't bleed out as well and they also end up much tougher with all the adrenaline pumping through them.
 This is how we do ours. They are upended in a killing cone, you could use an old traffic cone with some minor adjustments (cutting the hole bigger perhaps ). I only have two so I do two at a time. At Polyface they do like... 10 or more at one time. They have an awesome set up . I've been there. Wow.. it was nice. But I'm not doing thousands of birds .. just 10 today.
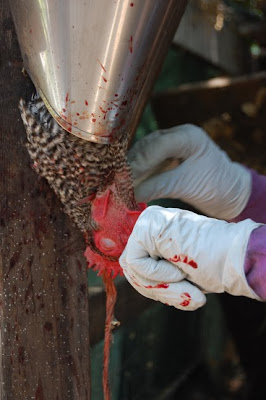 I use a double bladed narrow knife.. I think I got this one from Murray McMurray Hatcheries... . Unlike the books I've seen, I don't go along side the artery and then out.. I met a wonderful old man at our church (one of our pastors actually) who used to work in chicken processing and he told me they used to just stick the knife clean through to the other side hitting both arteries. You have to go behind the windpipe and esophagus . This lets them still breath and their heart pumps the blood out for a clean bleed. Some may say this sounds terrible... keeping them alive while they bleed to death but it is actually less traumatic than just whacking the head off. I've heard Susan Weed say (she is an herbalist and midwife) that she has spoken to women who nearly bled to death during childbirth and it actually feels euphoric and pleasant. You slowly slip away and feel light headed. Now, I've never asked a chicken... but I'm assuming it is similar. Anyway, I don't know if you can see my knife coming through there but that is about where you want it. It does take practice and if you don't get blood coming out at a good flow , you must go back and hit the artery or else they will not bleed out properly and they will take much longer to die. Blood should be coming out both sides if done properly .
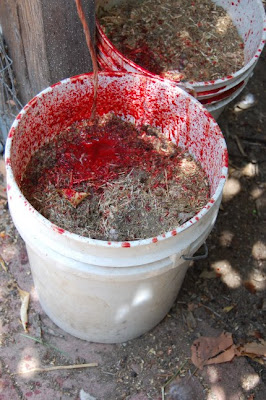 We stick buckets with mulch or shavings underneath to catch the blood, them compost it. The blood should be bright red... not dark .. If it is dark it is from a vein . Bright red is from and artery. At this point, after they are bled out and dead . I like to remove the head . That is where the hatchet comes in. It seems less bird like and more dinner like at that point. This is just a personal preference .. you certainly don't have to take the head off at this point.. But I don't want to see a featherless chicken with a head.. but again, that is just me.
 Then we scald. We use a turkey fryer. It works great. The water is about 145 F . That has seemed to work best for us. Too hot and you cook the skin, to cool and the feathers won't come out. Put a little dish soap in the water and it helps get the water down to the skin and they come out cleaner. ;-) Slosh the birds up and down holding on to the feet for about a minute. Keep checking the feathers. Pull on some wing feathers or tail feathers and stop scalding when they come out easily.
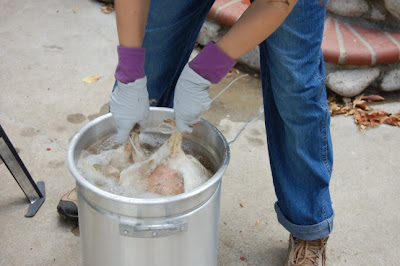 Slosh . Slosh slosh..
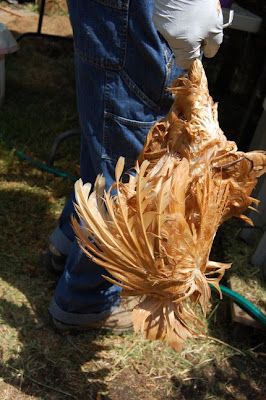 Then... you pluck.Take them out of the water, set them on a work surface and just grab handfuls of feathers and pull. Tail feathers are the toughest. Work over the carcass 'til you have it clean. You can singe off little hairs later with some flames. Either a lighter or a blow torch..
 I have a plucker.. A Featherman Plucker . You could also build yourself a Whizbang . This is one of the greatest inventions of all time. Right up there with A/C in cars... It is awesome . You throw in a scalded bird and flip the switch... in 30 seconds you have a naked chicken.

Is that cool or what??
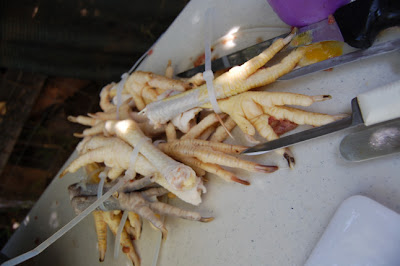 Then I pass off the birds to the gutters. The zip ties you see there I use to tie their feet together and then I put a bungee cord on that and hook that to the tree above where I'm bleeding them. This keeps them from flipping themselves out of the cones.... a rather unnerving experience. ... Anyway, the feet go.. They get cut off at the first joint there.
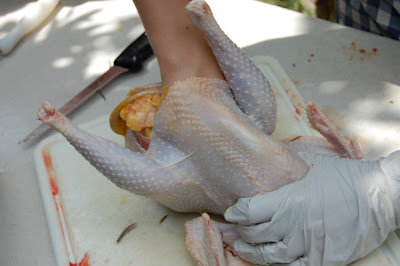 I don't have any pictures of slitting the neck skin to loosen the craw and windpipe.. but you do that. Then you make a small , shallow slice above the vent opening (if the bird is on it's back) through the skin and a layer of fat until you see an opening into the cavity , then you stick your hand in and make the hole bigger. The whole point of this is to NOT cut into the intestines. Then you work your hand around that mass of entrails and start working it loose. You want to go up by the neck and pull the stomach/craw all the way through. This is why you loosened it before when you cut into the neck skin. Ideally, you'll pull all this out in one big mass...
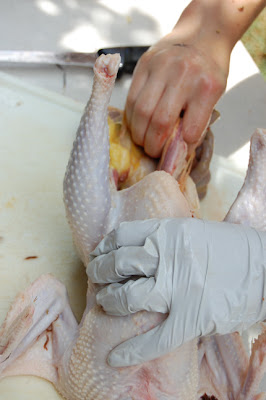
Like so. The intestines are still attached to the vent and you want to now take your knife and cut careful around the vent until you've freed the intestines and you can just pull everything out now. DON'T cut into the intestines. I should also mention here that it is a really good idea to fast your birds for at least 12 hours with just water . Then their craws won't be full of food and their intestines won't be so full. That makes everything a lot more pleasant for all involved.
 Going backwards.... here is removing the feet.. After all this, rinse, rinse, rinse. The lungs will be little red spongy things stuck to the back ribs. Using a lung puller (yes, there is such a thing) or your fingers, scrape them loose. Rinse more. Make sure you've got the cavity all cleaned out. Then chill the birds as soon as possible. We put them in coolers with ice water.
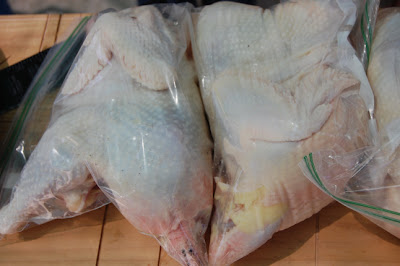 Then they get packaged and frozen.
 Or chopped up for dinner. Yumm. Don't you feel hungry now? These were old laying hens so they weren't tender like young broilers . Elly May cooked them in a low oven for 3 or 4 hours , braising them with a good Irish Stout. They were very tasty. They make up in flavor what they lack in tenderness.
 How poetic... j/k .. This isn't really in sequence and I don't kill them with a hatchet.. It sends the birds into shock and they don't bleed out as well and they also end up much tougher with all the adrenaline pumping through them.
 This is how we do ours. They are upended in a killing cone, you could use an old traffic cone with some minor adjustments (cutting the hole bigger perhaps ). I only have two so I do two at a time. At Polyface they do like... 10 or more at one time. They have an awesome set up . I've been there. Wow.. it was nice. But I'm not doing thousands of birds .. just 10 today.
 I use a double bladed narrow knife.. I think I got this one from Murray McMurray Hatcheries... . Unlike the books I've seen, I don't go along side the artery and then out.. I met a wonderful old man at our church (one of our pastors actually) who used to work in chicken processing and he told me they used to just stick the knife clean through to the other side hitting both arteries. You have to go behind the windpipe and esophagus . This lets them still breath and their heart pumps the blood out for a clean bleed. Some may say this sounds terrible... keeping them alive while they bleed to death but it is actually less traumatic than just whacking the head off. I've heard Susan Weed say (she is an herbalist and midwife) that she has spoken to women who nearly bled to death during childbirth and it actually feels euphoric and pleasant. You slowly slip away and feel light headed. Now, I've never asked a chicken... but I'm assuming it is similar. Anyway, I don't know if you can see my knife coming through there but that is about where you want it. It does take practice and if you don't get blood coming out at a good flow , you must go back and hit the artery or else they will not bleed out properly and they will take much longer to die. Blood should be coming out both sides if done properly .
 We stick buckets with mulch or shavings underneath to catch the blood, them compost it. The blood should be bright red... not dark .. If it is dark it is from a vein . Bright red is from and artery. At this point, after they are bled out and dead . I like to remove the head . That is where the hatchet comes in. It seems less bird like and more dinner like at that point. This is just a personal preference .. you certainly don't have to take the head off at this point.. But I don't want to see a featherless chicken with a head.. but again, that is just me.
 Then we scald. We use a turkey fryer. It works great. The water is about 145 F . That has seemed to work best for us. Too hot and you cook the skin, to cool and the feathers won't come out. Put a little dish soap in the water and it helps get the water down to the skin and they come out cleaner. ;-) Slosh the birds up and down holding on to the feet for about a minute. Keep checking the feathers. Pull on some wing feathers or tail feathers and stop scalding when they come out easily.
 Slosh . Slosh slosh..
  Then... you pluck.Take them out of the water, set them on a work surface and just grab handfuls of feathers and pull. Tail feathers are the toughest. Work over the carcass 'til you have it clean. You can singe off little hairs later with some flames. Either a lighter or a blow torch..
 I have a plucker.. A Featherman Plucker . You could also build yourself a Whizbang . This is one of the greatest inventions of all time. Right up there with A/C in cars... It is awesome . You throw in a scalded bird and flip the switch... in 30 seconds you have a naked chicken.
Is that cool or what??
 Then I pass off the birds to the gutters. The zip ties you see there I use to tie their feet together and then I put a bungee cord on that and hook that to the tree above where I'm bleeding them. This keeps them from flipping themselves out of the cones.... a rather unnerving experience. ... Anyway, the feet go.. They get cut off at the first joint there.
 I don't have any pictures of slitting the neck skin to loosen the craw and windpipe.. but you do that. Then you make a small , shallow slice above the vent opening (if the bird is on it's back) through the skin and a layer of fat until you see an opening into the cavity , then you stick your hand in and make the hole bigger. The whole point of this is to NOT cut into the intestines. Then you work your hand around that mass of entrails and start working it loose. You want to go up by the neck and pull the stomach/craw all the way through. This is why you loosened it before when you cut into the neck skin. Ideally, you'll pull all this out in one big mass...
Like so. The intestines are still attached to the vent and you want to now take your knife and cut careful around the vent until you've freed the intestines and you can just pull everything out now. DON'T cut into the intestines. I should also mention here that it is a really good idea to fast your birds for at least 12 hours with just water . Then their craws won't be full of food and their intestines won't be so full. That makes everything a lot more pleasant for all involved.
 Going backwards.... here is removing the feet.. After all this, rinse, rinse, rinse. The lungs will be little red spongy things stuck to the back ribs. Using a lung puller (yes, there is such a thing) or your fingers, scrape them loose. Rinse more. Make sure you've got the cavity all cleaned out. Then chill the birds as soon as possible. We put them in coolers with ice water.
 Then they get packaged and frozen.
 Or chopped up for dinner. Yumm. Don't you feel hungry now? These were old laying hens so they weren't tender like young broilers . Elly May cooked them in a low oven for 3 or 4 hours , braising them with a good Irish Stout. They were very tasty. They make up in flavor what they lack in tenderness.
 Ta da!! It isn't that complicated. I tried to keep the pictures as least nauseating as I could while still showing the essentials. We'll go back to garden and duck posts here soon. ;-)


Monday, October 5, 2009
Changin' the Beds..
We've had some issues with our top garden beds for awhile. Kind of a sun thing... The stuff in the back only gets a few hours of sun, ending at noon when it gets shaded by the fence. Nothing does very well in the back. So why waste all that space? Why not have a walkway there and run the beds the other direction? Well, it seemed like a big project and I didn't know if it would ever actually happen. I decided to plan it out , to see what kind of square footage I could get by changing things, would I lose some ? Would I gain some? and so on. I'm not really a planner so to go through all the trouble of measuring and marking up graph paper was kind of unusual for me. It gave me a headache. And I never did come up with anything solid.. But this past weekend it all came together in the hands of my very very capable father. He didn't get out any graph paper, he didn't even measure much, he just said , do it like this... and then he built it. We helped, but mostly he did all the work.
 Oh, these aren't garden beds obviously, but it is what the sky looked like above them when I was taking before pictures..
 Lovely power lines...
 Skies like this are rare here. We don't get many clouds..
 This looked really really cool. It was all feathery.
 The ladies are molting. That there is a plucked chicken..

OKAY, on to garden beds... These are before shots..

Interesting..

 New bed going in. It is just one big huge thing..
 I think it looks like a boat. I don't know what to name it though. The R.V.S (Royal Veggie Ship) Behemouth or something. Hey, did you know RMS stands for Royal Mail Ship? I didn't know that before. That sounds kind of lame. The Royal Mail Ship Titanic.. kind of loses something. ..
 Oh, these aren't garden beds obviously, but it is what the sky looked like above them when I was taking before pictures..
 Lovely power lines...
 Skies like this are rare here. We don't get many clouds..
 This looked really really cool. It was all feathery.
 The ladies are molting. That there is a plucked chicken..
OKAY, on to garden beds... These are before shots..

Interesting..

 New bed going in. It is just one big huge thing..
 I think it looks like a boat. I don't know what to name it though. The R.V.S (Royal Veggie Ship) Behemouth or something. Hey, did you know RMS stands for Royal Mail Ship? I didn't know that before. That sounds kind of lame. The Royal Mail Ship Titanic.. kind of loses something. ..
 ANYhow, now I have a ship to fill with dirt. Lots and lots and lots of dirt. We'll be making most of it. It is time for serious composting. Those 4x4's would make good scarecrows. I could do all the ones in back... I could have a whole family of them! Hmmm. Then the dogs could growl at the strangers in the garden. SO, that was the weekend.
Subscribe to:
Posts (Atom)
